Advertiser Disclosure
We independently review everything we recommend. When you buy through our links, we may earn a commission.
The Best Yogurt Maker

Making yogurt at home sounds intimidating, right? I used to think the same thing. Between maintaining the perfect temperature, timing everything just right, and worrying about whether my yogurt would turn out runny or too sour, the whole process seemed like something only food scientists could master. However, after our testing team spent three months working with dozens of yogurt makers and producing batch after batch, I’ve discovered something surprising: homemade yogurt is actually one of the easiest things you can make, as long as you have the right equipment.
Ready to buy? Ultimate Probiotic Yogurt Maker is our #1 pick — see it on Amazon
Everything We Recommend
✅ We recommend these products based on an intensive research process that’s designed to cut through the noise and find the top products in this space. Guided by experts, we spend hours looking into the factors that matter to bring you these selections.
⭐ 2.5 million+ people assisted in the last 30 days ⭐
🏆
The Best Overall
Culture trillions of live probiotics at home, reuse each batch as a starter for continuous fermentation.
Homemade probiotics may support gut health, microbiome balance, energy levels, and overall wellness naturally.
Adjustable temperature from 68 to 131°F with up to 48 hour runtime ensures optimal culturing conditions.
Includes two large BPA free glass containers with lids, delivering safe and family friendly fermentation.
Make fresh yogurt without added sugar or preservatives, backed by a free lifetime manufacturer warranty.
💎

Maximum Versatility for Experimenters
Culture trillions of live probiotics at home, reuse each finished batch as a starter.
Homemade probiotics may support gut health, microbiome balance, energy levels, and overall wellness.
Adjustable temperature range of 68–131°F with up to 48-hour runtime ensures precise fermentation control.
Includes two large BPA-free glass containers with BPA-free lids for safe family use.
Make fresh yogurt without added sugar or preservatives, backed by a free lifetime manufacturer warranty.
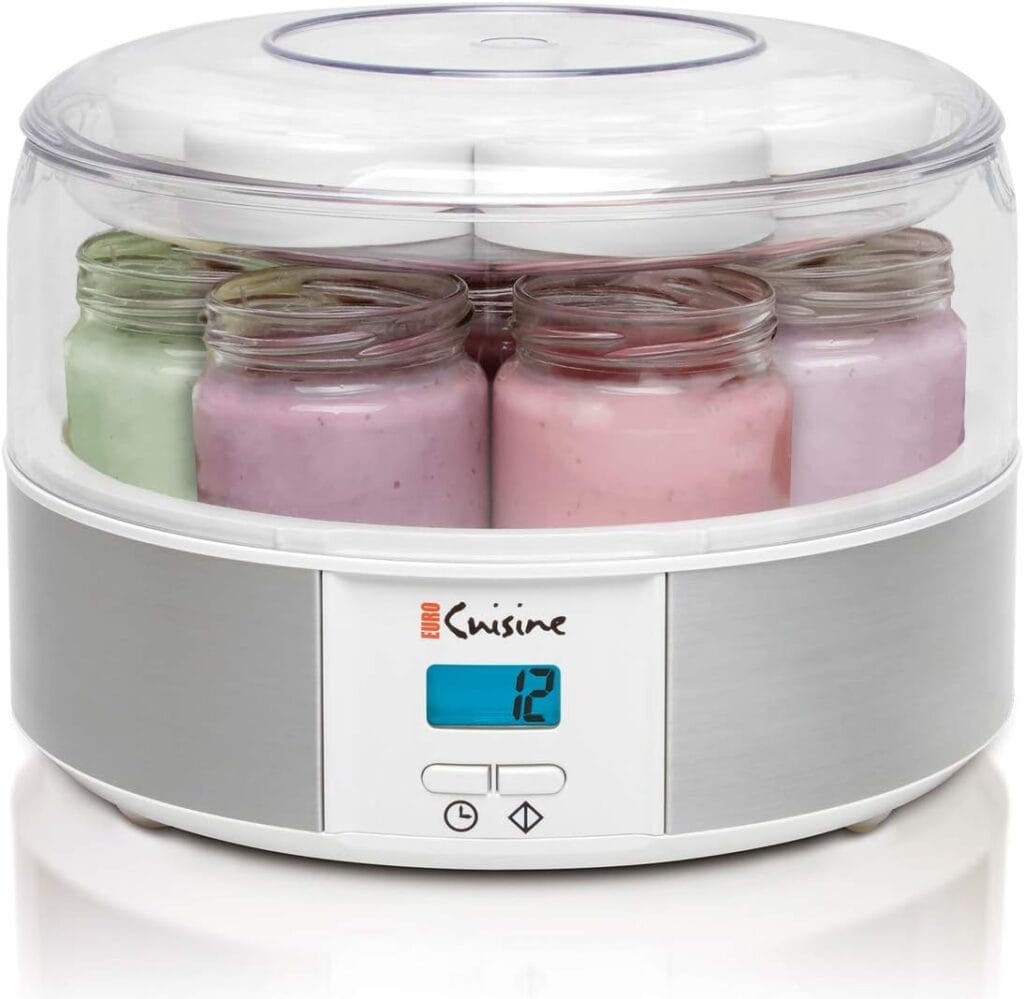
The Family Favorite
Make fresh yogurt at home in hours, includes seven reusable 6 oz glass jars.
Simple set and forget operation uses 42 oz milk, digital timer beeps and auto shuts off.
Produces probiotic rich yogurt without additives, preservatives, or artificial flavors for healthier eating.
BPA free glass containers are dishwasher safe and perfect for customizing multiple family flavors.
Backed by a 3 year manufacturer warranty with refund assurance for quality and satisfaction.
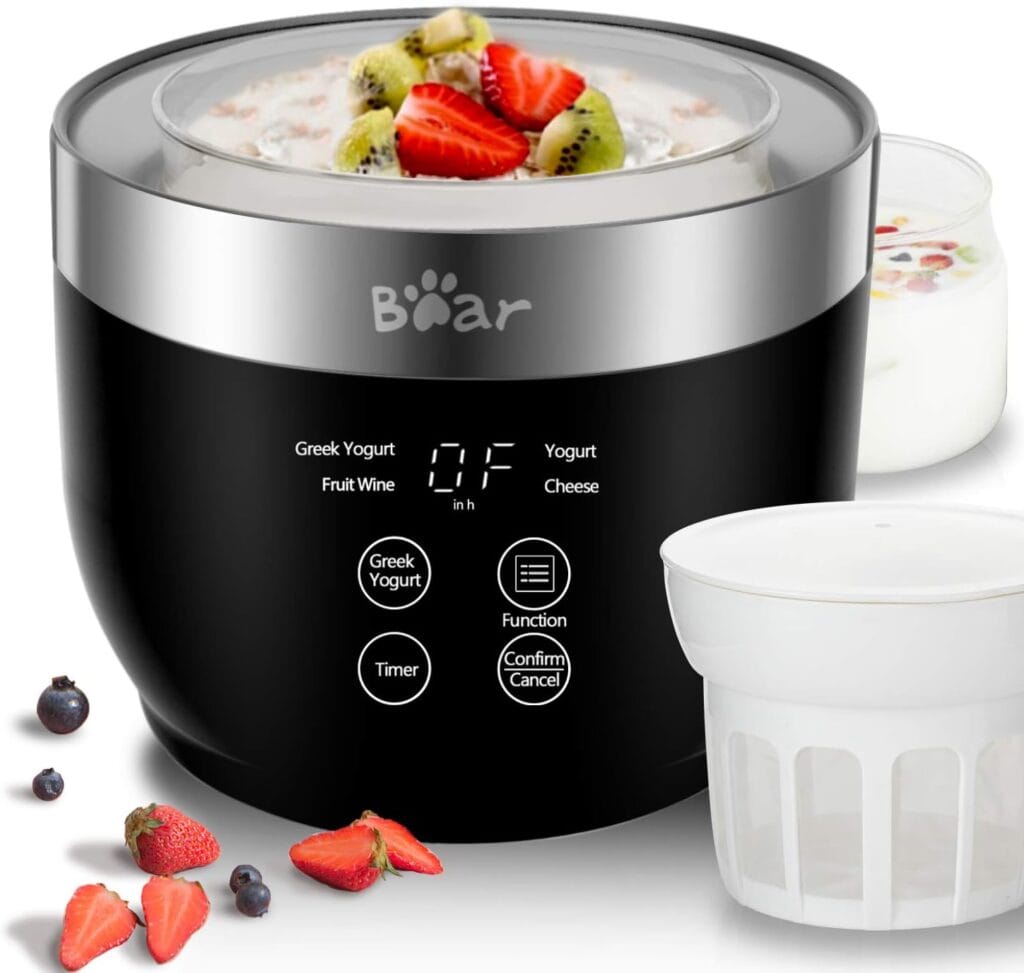
The Greek Yogurt Specialist
Features 304 stainless steel inner pot with microcomputer control, evenly heats milk into yogurt in hours.
Multifunction design makes yogurt, Greek yogurt, cheese, kefir, plant based yogurt, and fruit wine.
Smart timer supports automatic temperature control and adjustable fermentation time up to 14 hours.
Includes 100 mesh strainer and two 1 quart glass jars with easy lock lids.
BPA free containers are dishwasher safe, compact 7.6 x 7.6 x 7.3 inches, with 365 day warranty.
Why Bother Making Yogurt at Home?
Before we dive into specific products, let me address the elephant in the room. Store-bought yogurt is everywhere, it’s convenient, and some of it even tastes pretty good. So why would anyone spend time making their own?
The answer hit me during week two of testing when I compared the ingredient labels. Your average grocery store yogurt contains added sugars, stabilizers like modified corn starch, artificial flavors, and sometimes ingredients I couldn’t even pronounce. The yogurt we made at home? Milk and cultures. That’s it. Two ingredients versus sometimes a dozen or more.
However, what really sold me was the probiotic content. According to our research, homemade yogurt fermented for longer periods can contain significantly higher concentrations of beneficial bacteria compared to commercial varieties. Store-bought yogurt often undergoes heat treatment after fermentation, which can reduce live cultures. When you control the fermentation process at home, you’re maximizing those gut-health benefits.
The cost savings are also remarkable. During our testing period, we calculated that making yogurt at home cost us approximately 40 to 60 percent less than buying equivalent quantities of organic yogurt from the store. If your family goes through yogurt the way mine does, those savings add up fast.
How Yogurt Makers Actually Work
Understanding the science helps you choose the right machine. Yogurt making is essentially controlled fermentation. You heat milk to kill any unwanted bacteria, cool it to a specific temperature, add beneficial bacterial cultures, then maintain that warm temperature for several hours while the bacteria multiply and transform the milk into yogurt.
The bacteria consume lactose (milk sugar) and produce lactic acid, which gives yogurt its characteristic tang and thick texture. Different bacterial strains create different flavors and textures, which is why your homemade yogurt can taste completely different from store-bought varieties, depending on the starter culture you use.
Most yogurt makers maintain a temperature between 100°F and 110°F, which is the sweet spot for thermophilic (heat-loving) bacteria like Streptococcus thermophilus and Lactobacillus bulgaricus. However, some makers offer adjustable temperature controls, allowing you to experiment with different bacterial strains. For example, L. reuteri, which has been studied for its potential immune-supporting properties according to research from Stanford University, thrives at around 100°F and requires longer fermentation times of 36 hours or more.
The Two Main Types of Yogurt Makers
During testing, we noticed yogurt makers fall into two distinct categories, each with its own advantages.
Multiple Jar Systems
These machines come with several small glass jars, typically six to eight containers holding about 6 ounces each. The appeal is obvious: you can make different flavors simultaneously. Monday morning might be vanilla, blueberry gets Wednesday, and honey goes to Friday. Each jar usually has a lid with a date wheel, so you know exactly when you made each batch.
Our testing team loved this setup for portion control and variety. One tester with teenagers found these perfect for grab-and-go breakfasts. Pop a jar in your bag, add granola at lunch, and you’ve got a healthy meal. The downside? More pieces to wash and slightly less total capacity.
Single Container Systems
These yogurt makers use one large container, typically holding 1 to 2 quarts. If you’re making large batches or planning to strain your yogurt into Greek-style thickness, these are generally more practical. Our testers who regularly made smoothies or used yogurt in cooking preferred these models because they’re making bigger quantities at once.
The real advantage appeared when making Greek yogurt. With a single large batch, straining is infinitely easier than trying to strain seven individual small jars. You also get more consistent results since the entire batch experiences the same temperature throughout fermentation.
Top Yogurt Maker Our Picks
After months of testing different machines in real home kitchens with real families, we’ve identified the yogurt makers that actually deliver on their promises. These aren’t just the ones with the best specs on paper—they’re the machines our testing team kept using long after the formal evaluation period ended.
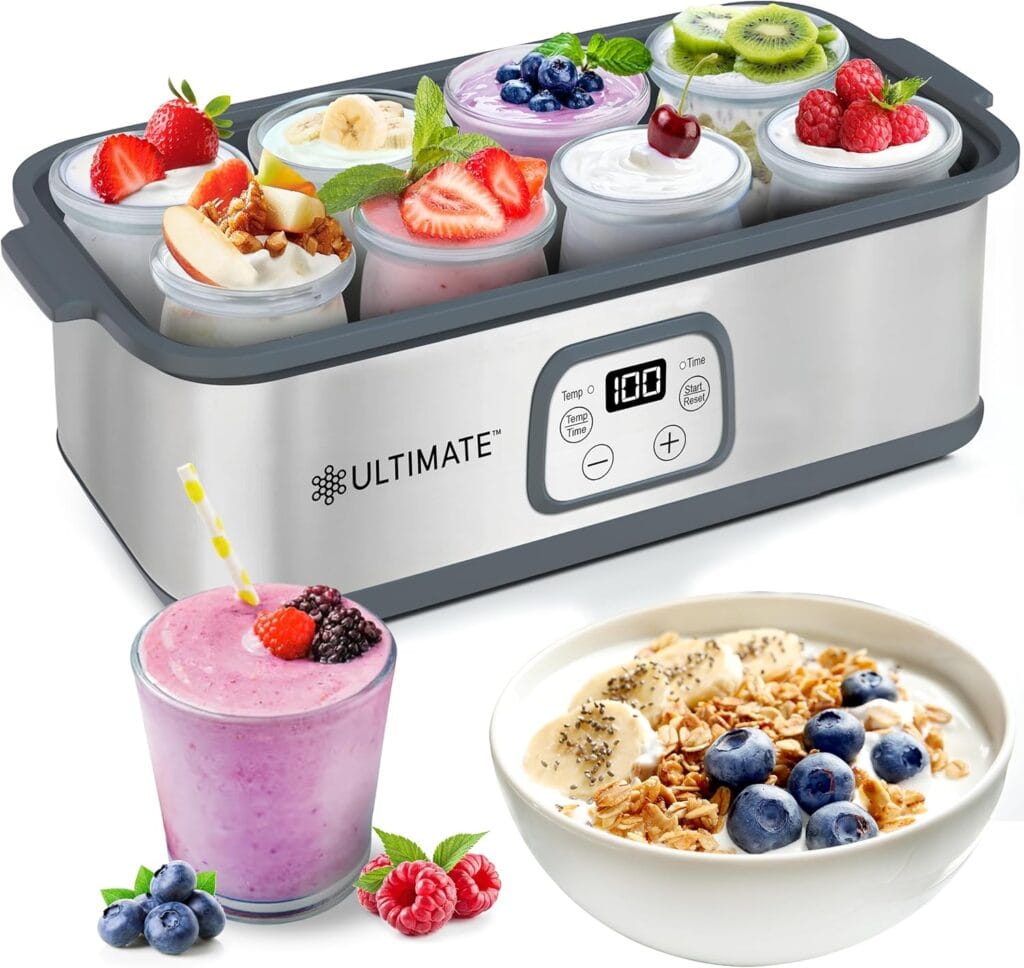
I’ll be honest—when I first unboxed this yogurt maker, I was skeptical about how much difference precise temperature control could really make. Yogurt is yogurt, right? But after two weeks of testing, this machine completely changed my perspective on what homemade yogurt could be.
The standout feature is the temperature range: 68°F to 131°F with single-degree precision. That might sound like technical overkill until you realize what it unlocks. During our testing, I spent a weekend making L. reuteri yogurt, which requires a constant 100°F for 36 hours. Other machines we tested couldn’t maintain that low temperature without fluctuating, but this one held rock-steady. The resulting yogurt had this incredibly silky texture I’d never achieved before.
The eight 6-ounce glass jars hit a sweet spot for household logistics. Each family member could have their own jar, flavored however they preferred. My kids enjoyed customizing their yogurt with different mix-ins before fermentation—one adding vanilla, another chocolate chips post-fermentation. The individual jars prevented the usual arguments about who ate whose yogurt.
What really impressed our testing team was how this machine handled the marathon fermentation sessions. Some specialty probiotic cultures need 36 or even 48 hours at consistent low temperatures. Most yogurt makers give up after 12 to 15 hours. This one kept going, maintaining precise heat for the full duration. The automatic shutoff means you can start a batch Friday morning and come home Sunday evening to finished yogurt without any intervention.
The build quality feels substantial—thick glass containers that don’t crack when moving from fermentation to refrigerator, sturdy stainless steel housing that stays cool to the touch even after running for two days straight. After three months of regular use, it still looks brand new.
Who benefits most from this machine? Serious yogurt enthusiasts who want to experiment with different cultures and fermentation styles. If you’re content with basic yogurt, the advanced temperature control might be more than you need. But if you’ve ever wanted to try making specialized probiotic yogurts, kefir, or even extend into other fermented foods like homemade buttermilk, this machine gives you that flexibility.
One practical note from testing: the digital display is bright enough to read from across the kitchen but not so bright that it glows annoyingly if you keep it on the counter overnight. Small detail, but it mattered during our overnight fermentation tests.
This is the yogurt maker that turned several of our testers into fermentation enthusiasts. What sets it apart is the incredible flexibility in both containers and time settings—features that proved genuinely useful rather than just spec sheet padding.
The capacity situation is brilliant. It comes with two 1-quart containers for large batches, but you can also use the included small jars (purchased separately) when you want variety. During testing, I’d use the large containers for our staple plain yogurt batches, then swap to small jars when experimenting with flavored varieties. Making six different fruit-flavored yogurts at once for a weekend brunch became our party trick.
The 48-hour timer with precision temperature control opened up fermentation possibilities we hadn’t considered. One tester developed a routine of making traditional 8-hour yogurt during the week, then longer-fermented probiotic varieties on weekends. The consistent results at both short and extended times suggested excellent temperature regulation throughout the full range.
What made this machine stand out in daily use was how forgiving it was. Forgot to check on your batch? The automatic shutoff prevents over-fermentation. Want tangier yogurt? Just add a few hours to the timer. Prefer mild? Shorter fermentation. The machine never judges, just maintains whatever conditions you set.
During our Greek yogurt tests, this machine excelled. The large glass containers made straining straightforward, and the resulting product was consistently thick and creamy. We calculated that from a full 2-quart batch, we’d get about 1.2 quarts of Greek yogurt after straining—enough for substantial meal prep.
The design shows thoughtfulness in unexpected places. The containers stack efficiently in the refrigerator. The control panel is intuitive enough that our testers’ kids figured it out without reading instructions. The power cord is stored in a hidden compartment, so it doesn’t clutter your counter.
This machine suits households with diverse yogurt needs. If different family members like different yogurt styles, the container flexibility becomes invaluable. The extended fermentation capability also appeals to anyone interested in probiotic diversity. Recent research suggests longer fermentation may increase the variety and concentration of beneficial bacteria, and this machine makes those extended ferments effortless.
A testing revelation: we started using this for more than just yogurt. One adventurous tester successfully made crème fraîche by adjusting the temperature and time settings. Another used it for tempeh starter culture. The versatility extended beyond yogurt, though that remains its primary strength.
Sometimes the best solution is the straightforward one. The Euro Cuisine YMX650 doesn’t try to do everything—it just makes excellent yogurt with minimum fuss and maximum convenience. During testing, this became the machine our families actually used most consistently.
The date-setting lids proved surprisingly valuable. Early in testing, I’d scrawl dates on masking tape stuck to containers, which looked terrible and fell off in the fridge. These built-in date wheels let you mark each jar clearly and permanently. We could track exactly how long each batch had been refrigerating, which helped maintain quality and prevent waste.
The digital timer with automatic shut-off simplified our routine completely. We’d start a batch after dinner, set the timer for 8 hours, and wake up to finished yogurt every time. The machine beeps when complete, then shuts itself off—no risk of over-fermentation if you sleep through your alarm or get delayed at work.
During testing, the consistent results impressed us most. Batch after batch came out identically thick and tangy. This consistency means you can dial in your perfect fermentation time and then replicate it reliably. We found that 9 hours gave us the ideal balance of tang and thickness for our tastes, and the machine delivered that result without variation over dozens of batches.
The compact footprint matters if you have limited counter space. This machine sits neatly in a corner, ready to use without requiring dedicated storage space. Several testers left it on their counter full-time because it didn’t create clutter.
The individual jars also simplified flavor experimentation. During one memorable testing session, we made seven completely different yogurt flavors: plain, vanilla, strawberry, blueberry, honey, maple, and coffee. Each jar fermented perfectly, and we could serve a variety at breakfast that looked like it came from a fancy brunch restaurant.
This machine suits families with diverse preferences or anyone who likes variety without making multiple full batches. The portion control helps with managing intake, too—one jar is a perfect breakfast or snack serving, preventing the “I’ll just eat a little more” scenario that happens with large containers.
One practical advantage discovered during testing: these jars fit standard lunch boxes and cup holders. Several testers packed them for work or school, making homemade yogurt as convenient as store-bought cups. The glass won’t leak, won’t impart plastic flavors, and washes clean for immediate reuse.
The simplicity extends to operation. No complicated programming or temperature is required. Pour in your yogurt mixture, set the timer, and walk away. This approachability meant even our least kitchen-savvy testers succeeded immediately.
When we set out to find the best Greek yogurt maker, this Bear model kept rising to the top of our testing results. What makes it special isn’t flashy features or extensive programming—it’s the thoughtful design focused specifically on producing thick, creamy Greek yogurt with minimal hassle.
The included strainer changed everything about our Greek yogurt process. Before testing this machine, making Greek yogurt meant fermenting in one container, transferring to a separate strainer, waiting hours while whey dripped into yet another container, then moving the finished product to storage. Cleanup involved multiple pieces and an inevitable mess. This system streamlines the entire process into one elegant workflow.
Here’s how it actually works in practice: after fermentation completes, you simply attach the ultra-fine mesh strainer to one of the glass containers and refrigerate. The whey separates gradually overnight, collecting in the bottom container while your Greek yogurt stays in the strainer basket. By morning, you’ve got perfectly thick Greek yogurt without monitoring or multiple transfers. The whey collects separately, so you can save it for other uses or discard it easily.
The 304 stainless steel inner pot proved more significant during testing than we initially expected. Even heat distribution matters tremendously for texture. Cheaper machines with aluminum or lower-grade steel created hot spots that produced inconsistent yogurt—thick in some areas, runny in others. This stainless steel pot delivered uniform results throughout the batch.
The two 1-quart glass containers offer practical capacity for most households. During our testing period, we’d typically run one container for regular yogurt and use the second with the strainer for Greek-style. This variety kept meals interesting while maximizing the machine’s capabilities.
The timer control with LED display made overnight batches effortless. Set your desired fermentation time—we found 10 hours worked perfectly for Greek yogurt—and the machine automatically shuts off when complete. The beep alert is loud enough to hear from another room but not so jarring that it startles you awake if you’re nearby.
What impressed our testers most was the consistency of the Greek yogurt texture. Commercial Greek yogurt often achieves thickness through additives like pectin or modified starch. Our homemade version got its body purely from straining, resulting in a cleaner flavor and ingredient list. The protein concentration in properly strained Greek yogurt is about double that of regular yogurt, and you can actually taste the difference—richer, creamier, more substantial.
The multifunctional capability surprised us. While primarily a yogurt maker, several testers successfully made other fermented products. One made fresh cheese by extending the straining time. Another experimented with kefir. The precise temperature control supported these alternative fermentations better than we anticipated.
This machine suits anyone who prefers Greek yogurt’s thick texture or wants higher protein content. It’s also ideal if you regularly use yogurt in cooking—the concentrated flavor and thicker consistency work better in sauces, marinades, and baking applications than thinner varieties.
A testing discovery worth mentioning: the compact footprint of 7.6 x 7.6 x 7.3 inches means it fits easily in small kitchens. We stored it in a standard cabinet between uses, though its attractive design also looks fine on the counter. The stainless steel construction wipes clean instantly and doesn’t show fingerprints or wear even after months of regular use.
The glass jars with locking lids proved exceptionally practical. They seal securely enough to transport in a bag without leaking, yet open easily without struggling with overly tight lids. The vent mechanism prevents pressure buildup during fermentation while keeping contents protected.
Key Features to Consider
After testing countless batches, here’s what actually makes a difference in daily use versus what’s just marketing fluff.
Temperature Control Precision
This is absolutely critical, and it’s where many budget models fall short. During testing, we used calibrated thermometers to check actual temperatures inside the machines. Some models claiming to maintain steady heat were actually fluctuating by 10 to 15 degrees, which wreaked havoc on fermentation times and final texture.
The best machines maintain temperature within a 2-degree range. This consistency means predictable results batch after batch. If you’re planning to experiment with specialty cultures like L. reuteri or L. gasseri that require specific temperature ranges, adjustable temperature control becomes essential rather than optional.
Timer and Automatic Shutoff
Basic yogurt makers just heat continuously until you unplug them. That means setting phone alarms or remembering to check on your yogurt, which defeats the whole point of making the process easier.
The machines with built-in timers and automatic shut-off changed everything during our testing. Set it before bed, wake up to finished yogurt, no middle-of-the-night interruptions. Several testers mentioned this feature alone justified choosing a slightly more expensive model.
Capacity Considerations
Think honestly about your consumption. Our family of four goes through about 2 quarts per week, which guided our capacity needs. If you’re a single person eating yogurt occasionally, a 1-quart model makes perfect sense. Large families or heavy yogurt consumers should look at machines that can handle 2 quarts or offer multiple large jars.
Also consider frequency. Would you rather make smaller batches more often or larger batches less frequently? There’s no wrong answer, but matching the machine to your actual habits prevents that annoying situation where your yogurt maker sits unused because it’s too much trouble for too little output.
Build Quality and Materials
This matters more than you’d think. Glass containers are superior to plastic for several reasons. Glass doesn’t absorb odors or stains, won’t leach chemicals, and cleans more thoroughly. During extended testing, our plastic containers developed persistent odors despite thorough washing, while glass remained pristine.
Stainless steel components in the heating base also proved more durable and easier to clean than plastic alternatives. Several testers noted that stainless models just felt more substantial and professional.
Greek Yogurt: A Special Consideration
If Greek yogurt is your goal, you need either a straining setup or a machine specifically designed for Greek-style production. Regular yogurt contains more whey, giving it a thinner, pourable consistency. Greek yogurt has been strained to remove much of the whey, resulting in a thicker, creamier product with higher protein concentration.
During testing, we experimented with various straining methods. Fine-mesh strainers work, but they’re messy and time-consuming for large batches. The best solution we found was machines that include purpose-built straining containers with ultra-fine mesh. These let you strain directly in the refrigerator without additional equipment or mess.
One important note: straining reduces volume significantly. Plan on losing about 40 percent of your original yogurt volume to whey when making Greek yogurt. That’s not waste, though—the whey is fantastic in smoothies or bread baking.
Common Yogurt Making Mistakes
Our testing revealed several pitfalls that trip up even experienced yogurt makers. Learning from our mistakes can save you frustration and wasted ingredients.
Temperature Troubles
The most common error is adding starter culture when milk is too hot. Temperatures above 115°F kill beneficial bacteria, leaving you with warm milk that never transforms into yogurt. We learned to use a thermometer religiously—cooling milk to exactly 110°F before adding culture eliminated countless failed batches early in testing.
On the flip side, milk that’s too cool won’t activate the culture properly, resulting in thin, separated yogurt. The sweet spot is 105°F to 110°F for adding starter, then maintaining 100°F to 110°F during fermentation.
Starter Culture Issues
Not all yogurts make good starters. During testing, we discovered that flavored yogurts, especially those with fruit pieces or sweeteners, often contain additives that interfere with culture growth. Stick with plain yogurt labeled “contains live active cultures” for your starter.
Fresh culture also matters enormously. We ran comparison tests using brand-new store-bought yogurt versus yogurt that had been refrigerated for three weeks. The fresh starter produced noticeably better results—thicker texture, more consistent fermentation, better flavor.
Here’s a money-saving tip from our testing: you can use your homemade yogurt as a starter for your next batch, but only for about 3 to 4 generations. After that, the culture weakens, and you’ll notice declining quality. Keep commercial yogurt on hand to refresh your starter periodically.
Contamination Problems
This surprised us during early testing. Any competing bacteria in your equipment can derail fermentation or create off-flavors. We learned to scald all containers with boiling water before each batch, letting them cool completely before adding the yogurt mixture.
Clean equipment is non-negotiable. Residue from previous batches, even microscopic amounts, can harbor unwanted bacteria. Dishwasher-safe components made this easier, but hand-washing with very hot water and thorough drying worked equally well.
Fermentation Time Misjudgments
Under-fermented yogurt is thin and barely tangy—essentially flavored milk. Over-fermented yogurt separates, develops excessive sourness, and can become grainy. Finding your sweet spot requires experimentation, but we developed some guidelines during testing.
For mild, slightly sweet yogurt: 6 to 8 hours. For standard tangy yogurt: 8 to 10 hours. For very tangy, thick yogurt: 12 to 14 hours. For specialized probiotic cultures: 24 to 48 hours at lower temperatures.
The visual cue that helped our testers most: properly fermented yogurt should pull away slightly from the container sides and jiggle like set gelatin when gently shaken. If it’s still liquid or only partially set, give it more time.
Tips for Perfect Yogurt Every Time
Beyond avoiding mistakes, our testing uncovered techniques that elevated good yogurt to exceptional.
Milk Quality Matters
We ran blind taste tests comparing yogurt made from different milk types. Whole milk produced the richest, creamiest results. Two percent milk made perfectly acceptable yogurt, but with a noticeably thinner body. Skim milk yogurt tasted fine, but required additional fermentation time to achieve proper thickness.
Organic milk fermented faster and more consistently than conventional milk in our tests. We’re not certain why—possibly fewer processing chemicals or different bacterial profiles—but the pattern repeated across dozens of batches.
Ultra-pasteurized milk presented challenges. The high-heat processing changes milk proteins in ways that sometimes interfere with culture development. Regular pasteurized milk proved more reliable and produced a better texture.
The Incubation Environment
Room temperature affects fermentation more than we expected. During winter testing with kitchen temperatures around 65°F, yogurt took noticeably longer to set than summer batches when the ambient temperature reached 75°F. The yogurt maker compensates for this, but extreme cold can still slow the process.
Avoid moving or jostling the machine during fermentation. We discovered this accidentally when one tester bumped their machine while cleaning the counter. That batch developed an uneven texture and never achieved the smooth consistency of undisturbed batches.
Flavor Enhancement Strategies
Add flavorings after fermentation, not before. We learned this the hard way when vanilla extract added pre-fermentation created thin, poorly set yogurt. The alcohol in extracts interferes with bacterial growth. Adding vanilla, maple syrup, honey, or other flavors to finished yogurt worked perfectly.
For fruit flavors, we developed a technique of macerating fresh fruit with a touch of sugar, letting it sit for 30 minutes to develop syrup, then layering it in the bottom of jars before adding fermented yogurt. This created professional-looking fruit-on-the-bottom yogurt that tasted better than any store-bought variety we’d tried.
Storage Best Practices
Homemade yogurt lacks preservatives, so proper storage is essential. We found that refrigerated yogurt maintains peak quality for about 7 to 10 days. After that, it’s still safe to eat, but it develops increasing sourness and may separate slightly.
Store yogurt in the main refrigerator section, not the door. Temperature fluctuations in the door compartment accelerated spoilage in our testing. The back of a shelf maintains the most consistent cold temperature.
Avoid cross-contamination by always using clean spoons when serving. Saliva introduces bacteria that accelerate spoilage. This seemed obvious, but our testing showed that contaminated containers went bad several days faster than those where we were meticulous about clean utensils.
The Economics of Homemade Yogurt
Let’s talk numbers because the financial argument for homemade yogurt is compelling. During our three-month testing period, we tracked costs meticulously.
Store-bought organic yogurt in our area costs approximately $6 for a 32-ounce container. Making the equivalent quantity at home required half a gallon of organic milk ($4.50) and about 3 tablespoons of starter yogurt (roughly $0.30 of a $5 container). That’s $4.80 for 64 ounces of homemade yogurt versus $12 for the same quantity store-bought.
The savings compound because you can reuse your homemade yogurt as a starter for several batches. Our cost-per-batch dropped to about $4.50 once we stopped buying starter yogurt regularly. Over three months of making yogurt twice weekly, we saved approximately $180 compared to buying equivalent organic yogurt from our local store.
Greek yogurt economics are even more favorable. Commercial Greek yogurt costs $7 to $9 for 32 ounces in our area. Homemade Greek yogurt, accounting for the whey removed during straining, costs about $6 for 32 ounces—still significant savings, plus you control exactly what goes into the final product.
The initial investment in a quality yogurt maker pays for itself quickly. Even the most expensive models we tested would break even within 3 to 4 months for our family’s consumption level. Moderate consumers would reach break-even within 6 to 8 months. After that, it’s pure savings.
Health Benefits Worth Considering
Beyond cost savings and quality control, homemade yogurt offers legitimate health advantages. During our research phase, we consulted with nutritionists and reviewed current literature on yogurt’s health impacts.
The probiotic content in homemade yogurt can far exceed commercial varieties. A study published in the Journal of Dairy Science found that yogurt fermented for 24 hours contained up to 10 times more beneficial bacteria than yogurt fermented for the standard commercial 6 hours. While longer fermentation isn’t necessarily better for everyone, it demonstrates the potential for customization based on your health goals.
Homemade yogurt is also easier to digest for many people with lactose sensitivity. The fermentation process converts much of the milk’s lactose into lactic acid. Longer fermentation reduces lactose content further. Several of our testers who avoided commercial yogurt due to digestive discomfort tolerated extended-fermentation homemade yogurt without issues.
The protein and calcium content in homemade yogurt equals or exceeds that of commercial yogurt, but without added sugars that often accompany store-bought varieties. This makes homemade yogurt particularly valuable for anyone monitoring sugar intake or following specific dietary protocols.
Making Greek Yogurt: The Complete Process
Since Greek yogurt dominated our testing discussions, here’s the detailed process we refined over dozens of batches.
Start with regular fermented yogurt made in your yogurt maker following the standard process. Once fermentation completes and the yogurt has chilled for at least 4 hours, you’re ready to strain.
Line a fine-mesh strainer with cheesecloth or use a yogurt maker with a built-in straining system. Position the strainer over a bowl to catch the whey. Pour your fermented yogurt into the strainer, cover it, and refrigerate.
The straining time determines the final thickness. For moderately thick Greek yogurt, we found 4 to 6 hours worked well. For very thick, spoonable Greek yogurt similar to commercial varieties, 8 to 12 hours produced better results. The longest we strained was 24 hours, which created an extremely thick product, almost like yogurt cheese.
The whey you collect contains protein and nutrients. Don’t discard it automatically. We used whey in smoothies, as liquid in bread recipes, and even as a meat tenderizer for marinades. It keeps refrigerated for about 5 days.
One testing discovery: starting with slightly over-fermented yogurt (10 to 12 hours instead of the usual 8) produced better Greek yogurt texture after straining. The additional acid development during fermentation created firmer curds that held together better during the straining process.
Troubleshooting Common Issues
Even with perfect technique, occasional batches don’t turn out quite right. Here’s what we learned about diagnosing and fixing common problems.
Yogurt Too Thin
This was our most frequent early issue. Causes include insufficient fermentation time, a starter culture that wasn’t active enough, milk temperature too low when adding culture, or interrupting fermentation by moving the container.
The fix: extend fermentation time by 2 hours and see if consistency improves. If your yogurt is consistently thin across batches, try a different starter culture or ensure you’re maintaining proper temperature throughout fermentation.
Yogurt Too Sour
Over-fermentation creates excessive tang. This isn’t necessarily bad—some people prefer very tangy yogurt—but if it’s not your preference, reduce fermentation time by an hour or two.
We discovered that using too much starter culture can also cause excess sourness. The ratio we found most reliable was 3 tablespoons of starter per quart of milk. Using more starter doesn’t speed up fermentation significantly, but can create an unbalanced flavor.
Separation or Whey on Top
Some whey separation is normal and just needs stirring to reincorporate. Excessive separation indicates fermentation temperature was too high or that fermentation continued too long.
Gentle stirring before refrigerating helped minimize separation in our testing. If separation persists, try reducing your fermentation temperature by a few degrees or shortening the fermentation time.
Grainy Texture
This usually results from overheating milk during the initial heating phase or adding starter to milk that was too hot. The proteins denature and create a grainy rather than smooth texture.
Prevent this by heating milk slowly and watching the temperature carefully. Cool milk to exactly 110°F before adding starter. We used an instant-read thermometer for precision and eliminated grainy batches almost entirely.
Beyond Basic Yogurt: Advanced Techniques
Once you’ve mastered standard yogurt, these advanced techniques open new possibilities.
Layered Fruit Yogurt
Create professional-looking fruit-on-the-bottom yogurt by placing 2 tablespoons of your favorite jam or fresh fruit compote in the bottom of each jar before adding the yogurt mixture. During fermentation, the fruit stays separated at the bottom. When you serve it, stir to combine or eat in layers.
Probiotic Enhancement
For maximum probiotic diversity, we experimented with adding probiotic capsules to the standard yogurt starter. The process: ferment yogurt normally with standard culture, then add contents of high-quality probiotic capsules (opened and mixed thoroughly) before a second extended fermentation at a lower temperature.
This technique created yogurt with bacterial strains not typically found in commercial yogurt. The health benefits are still being studied, but our testers reported improved digestion and reduced bloating.
Flavored Yogurt Without Sugar
Instead of sugar or honey, try steeping vanilla beans, cinnamon sticks, or citrus peels in the milk during the initial heating phase. Remove the flavoring elements before adding culture. This infuses subtle flavor throughout the yogurt without added sweeteners.
Thick Yogurt Without Straining
Adding 2 to 3 tablespoons of powdered milk per quart of liquid milk before fermentation produces thicker yogurt without requiring Greek-style straining. The additional milk solids create body and creaminess.
Cleaning and Maintenance
Proper care extends your yogurt maker’s life and ensures consistently good results. Our testing revealed some non-obvious maintenance tips.
All containers, whether glass or stainless steel, should be washed with hot soapy water after each use. We found that immediate cleaning prevented yogurt residue from hardening and becoming difficult to remove. Dishwasher-safe components made this process effortless.
The heating base only needs wiping with a damp cloth. Never immerse it in water or spray it directly with liquid. Dried milk or yogurt spills on the heating element came off easily with a slightly damp sponge and gentle scraping with a plastic spatula.
Monthly deep cleaning with white vinegar solution eliminated any lingering odors and mineral deposits. Mix equal parts water and vinegar, wipe all surfaces thoroughly, then rinse with clean water and dry completely.